Products
Solutions
Resources
9977 N 90th Street, Suite 250 Scottsdale, AZ 85258 | 1-800-637-7496
© 2024 InEight, Inc. All Rights Reserved | Privacy Statement | Terms of Service | Cookie Policy | Do not sell/share my information

On your contracts, vendor change orders or VCOs are used when you need to manage and track contract changes between you and the vendor (subcontractor or supplier) to account for unforeseen changes that come up during the execution of the project. In the system on each contract record, you can add VCO records to keep track of these changes.
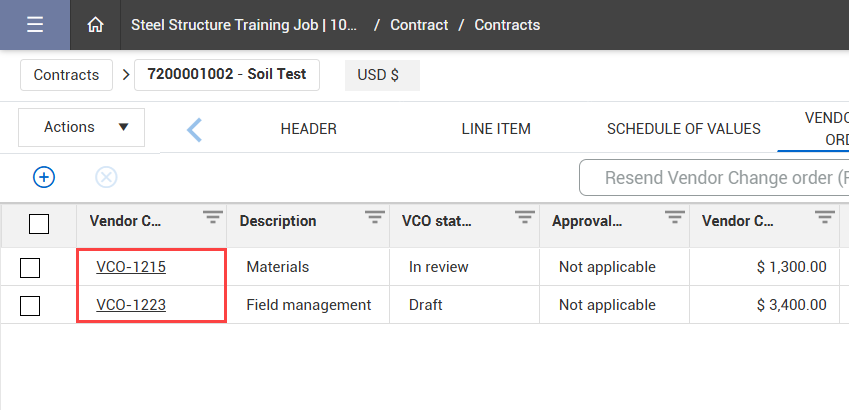
You manage VCOs by opening a contract’s record and selecting the Vendor Change Order Log tab.
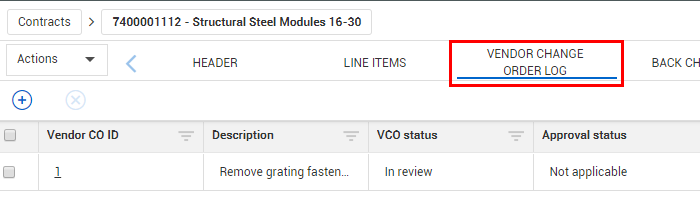
The Vendor Change Order Log tab lists all the VCOs for your contract. The Totals row at the bottom of the Vendor CO amount column shows the total of all vendor change orders for the contract.
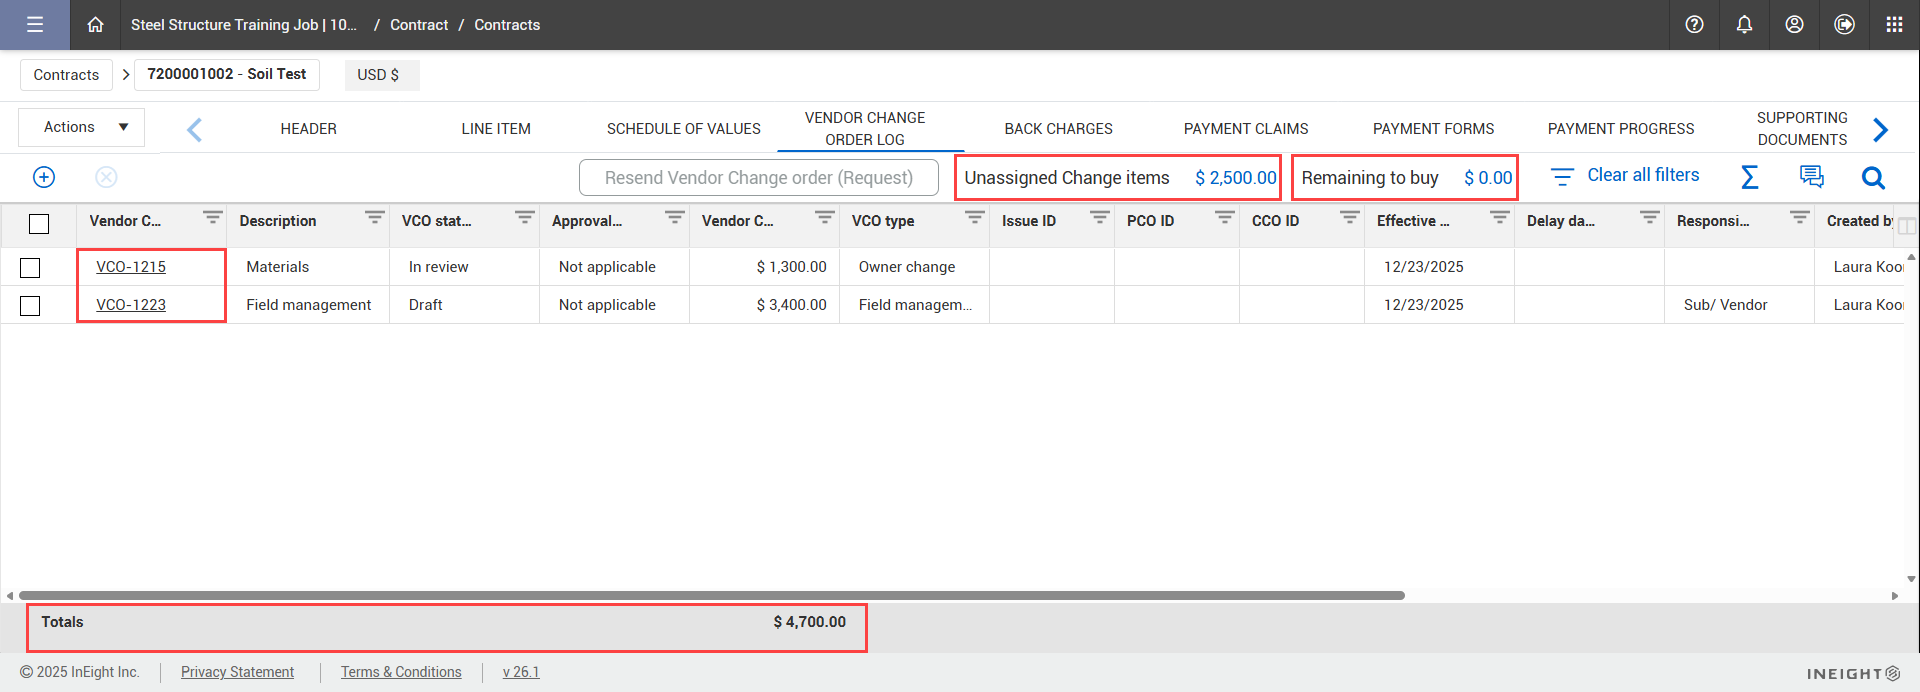
The Unassigned Change items field shows the sum of any issue, PCO and CCO pricing items from InEight Change which have been assigned to the vendor contract, but not yet associated to a VCO. You can click the link in the Unassigned Change items total to see a list of the unassigned change items that contribute to the total. You can then click on an issue ID to view details of the change item in InEight Change.
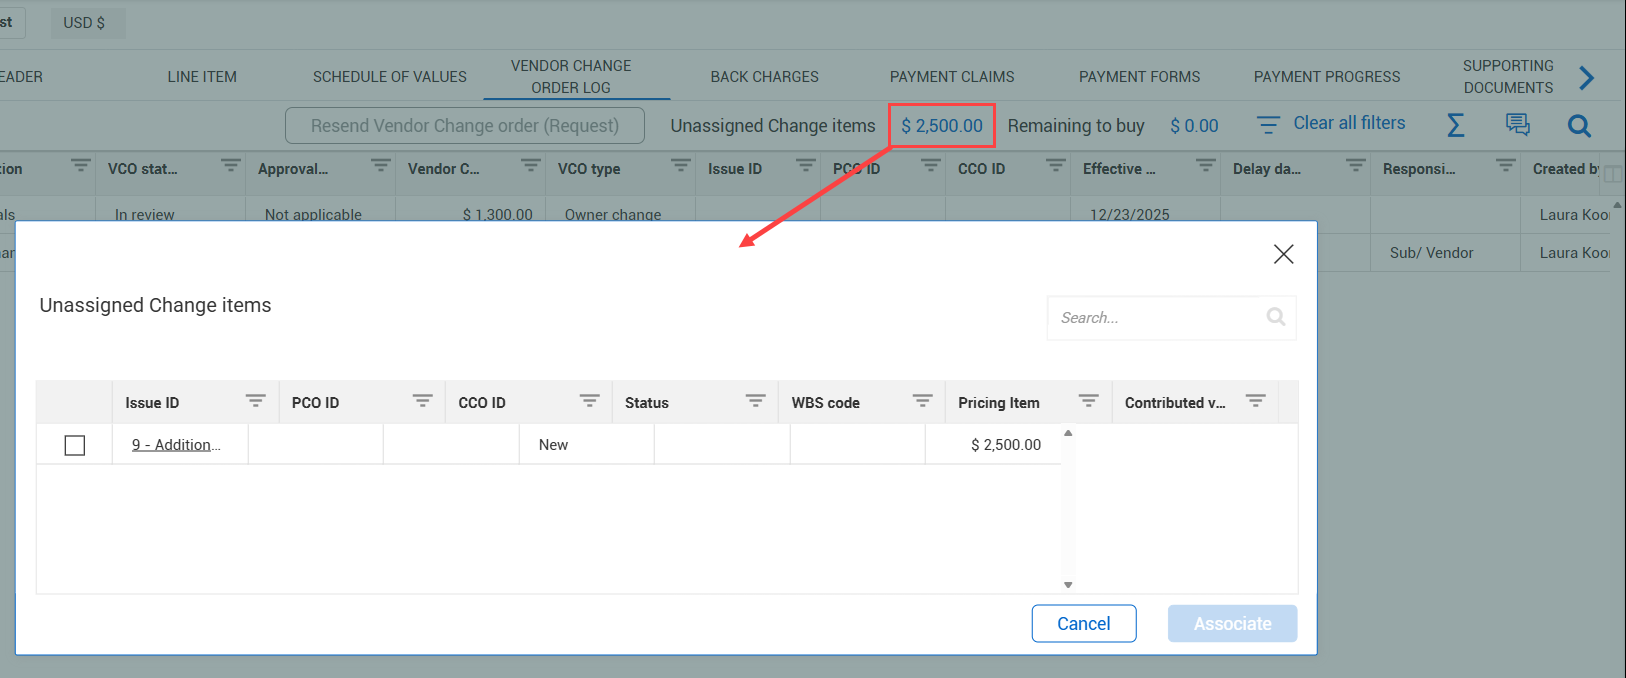
You can associate unassigned Change items to a new, existing, or executed vendor change order. To associate a Change item, select the check box for the item, and then click Associate.
In the Associate Change item dialog box, you can associate the Change item to a new or existing unpublished vendor change order.
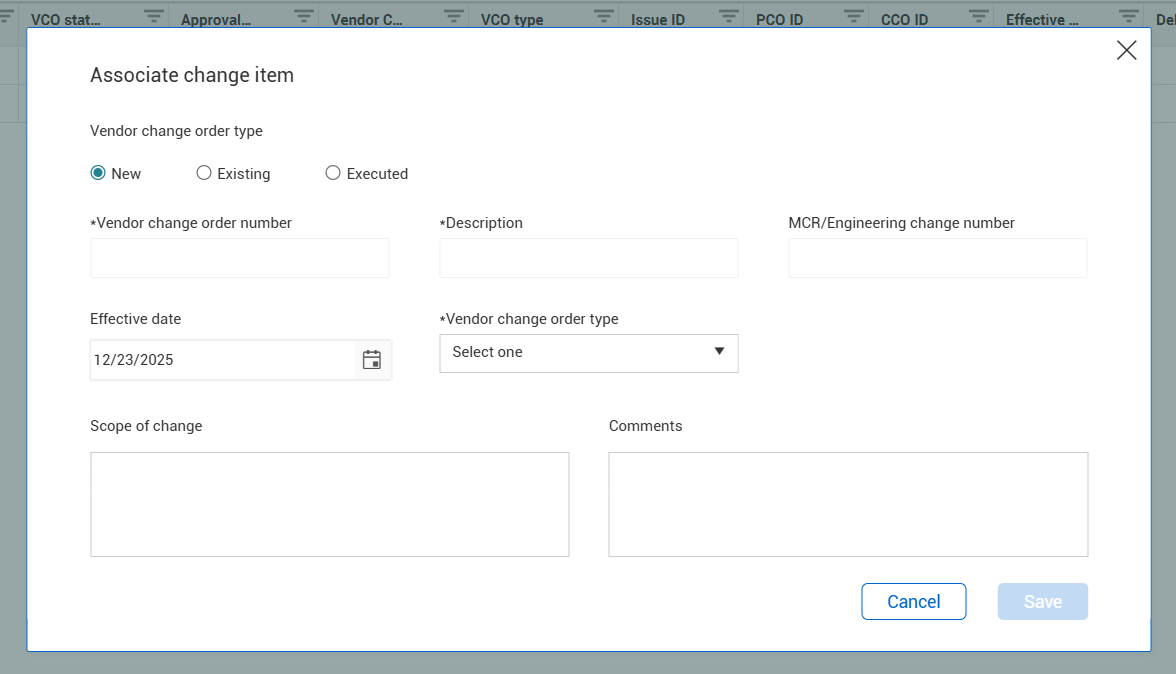
If you have the permission Edit executed vendor change order details, you can select Executed to view a list of executed vendor change orders. Using the Executed option can be helpful when a change order was executed without the Change items, and you want to reduce the value of the unassigned Change items and assign any items that were missed at a later time.
The permission Edit executed vendor change order details can be added in Permissions > Contract > Contracts > Edit contracts.
The Remaining to buy field shows the amount left in the unawarded value of the bid package. If the contract is a project Master Agreement, the Remaining to buy field reflects the difference between the Master Agreement current value and the sum of the current value of all associated contracts.
To open a VCO record, click on the hyperlinked VCO ID.
The Vendor change order record contains a header and tabs of information to track your change order.
| Field/Section | Function | |
|---|---|---|
|
1 |
VCO total |
The total cost for the change order agreed upon between you and the vendor. |
|
2 |
Remaining amount to allocate |
The remaining change order cost not covered by the line items on the VCO. The value of this field must be zero +/- 0.00999 to start workflow, submit, publish, or execute the VCO. The +/- 0.00999 accounts for differences in decimal precision. |
|
3 |
Delay days due to issue |
Documents how long of a delay the change order causes. |
|
4 |
Responsible party |
Tracks who is responsible for the next step in processing the VCO. Options include (e.g., client, vendor/sub, your company name). These options are defined by your administrative team. With the correct permissions, you can change the responsible party. |
|
5 |
Vendor CO status |
Tracks what step the VCO is on in the change order process. While the options on the drop-down list are company-specific, examples include:
With the correct permissions you can change the status. |
| 6 | Approval status | Shows the status of the VCO workflow approval. |
|
7 |
Contract totals icon |
Shows a slide out panel that contains a breakdown of your contract’s totals. |
| 8 | Add supporting document | Lets you create a new supporting document or add a supporting document from the Supporting document list or InEight Document. |
|
9 |
Notes icon |
Opens a slide out panel for entering notes related to the contract. |
|
10 |
Cancel, Save and Start Approval, and Save buttons |
Select to cancel, Save and start Approvals or save the VCO. |

The following steps walk you through adding a vendor change order to your contract.
From the Contract > Contracts page, click a contract ID or description to open a contract.
Click on the Vendor Change Order Log tab.

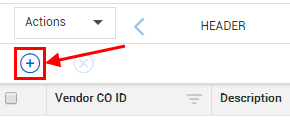
Click the Add icon to add a vendor change order.
The Vendor change order details page opens.
Fill out the vendor change order information.
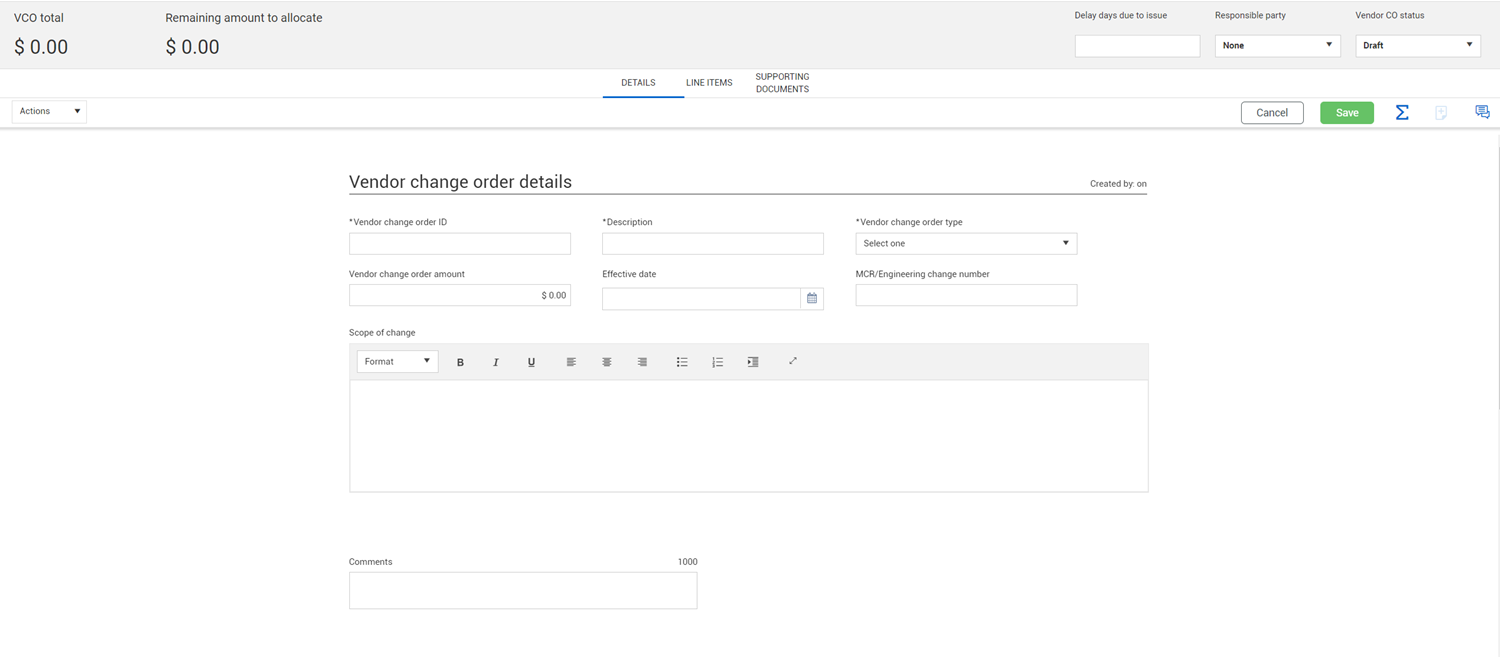
In the banner at the top of the page, select the Responsible party from the drop-down list, and then enter Draft for the Vendor CO status.
Click Save.
The Vendor change order record contains tabs for entering the following VCO details: Details, Schedule of values, Line Items and Supporting Documents.
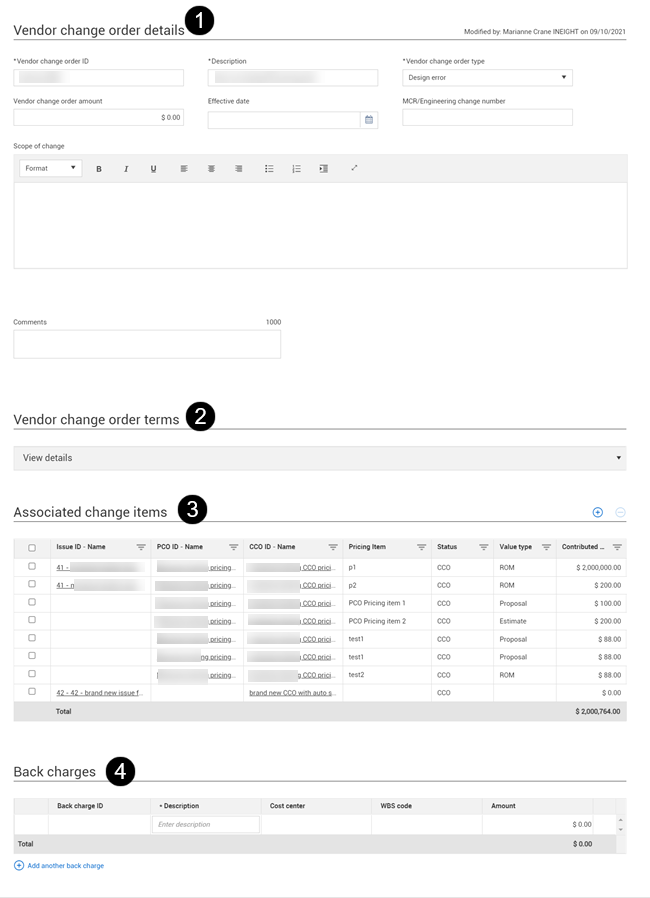
Use the Details tab to enter vendor change order details, terms, associated change items, and back charges.
| Field/Section | Function | |
|---|---|---|
|
1 |
Vendor change order details |
Where you can enter basic information about the VCO, including Vendor change order number, Description, Vendor change order amount, Effective Date, Change order type, and Scope of change. |
| 2 | Vendor change order terms | Where you can enter terms about the VCO, including vendor change order inclusions, exclusions, and warranty. You can also configure ten custom terms in Organization > Settings > Contract custom labels. |
|
3 |
Associated change items |
Where you can add issues or existing change items to the section, indicating the issue status, value type, contributed value, PCO name, and CCO name. You can also add an existing issue. If the issue has multiple pricing items, a line for each pricing item is added. The Contributed value column shows the amount of each pricing item. Contract converts the contributed value from the project currency to the contract currency. |
|
4 |
Back charges |
Enables you to add a back charge to VCO. Any back charges associated with the VCO from the Back charges detail page show here automatically. |
The Schedule of values tab contains schedule of value items from the contract-level Schedule of values page. You can use the schedule items in the vendor change order to provide detail that is not provided by line items. You can also push values from schedule items to the Line items tab or pull schedule item values into the Line items tab.
The vendor change order Schedule of values tab format is similar to the contract Schedule of values tab. It contains the following sections:
| Section | Description |
|---|---|
| Current schedule line value | The line value in its current state in the contract schedule of values. |
| Change order adjustment | Detailed information about the change order for the scheduled item. |
| Total revised value | The total revised value of the schedule item. As you make changes to a schedule item through a vendor change order, the total revised value reflects the value after the change order is executed. |

See Schedule of values tab for more information about the schedule of values.
You can add a new schedule item to the vendor change order schedule of values when the item does not already exist on the contract-level schedule of values.
From the vendor change order Schedule of Values page, click the Add icon, and then select Add new schedule item. The Add Schedule item slide-out panel opens.
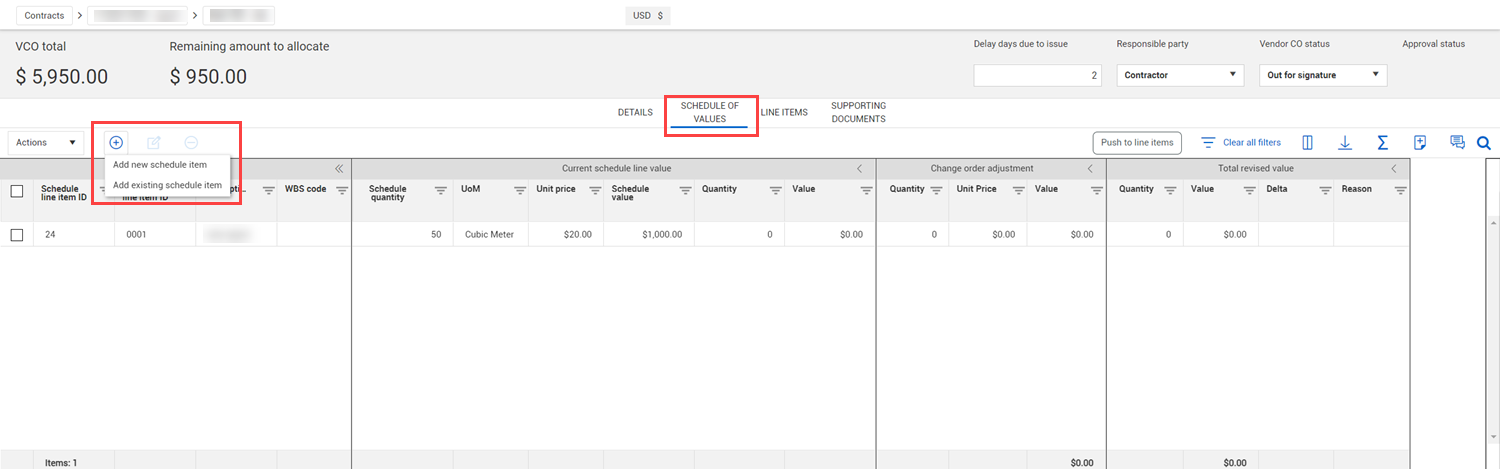
Enter the schedule item information, and then click Add.
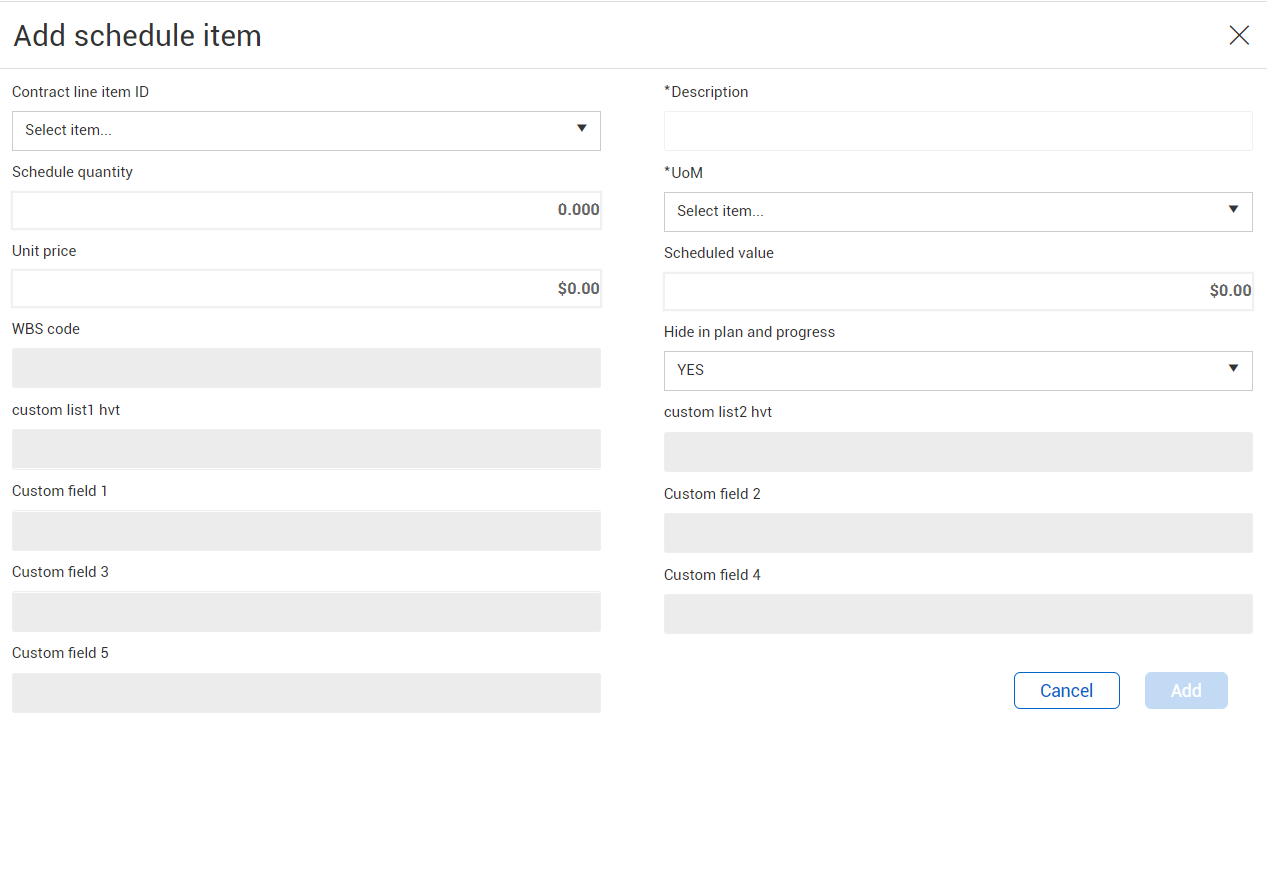
The schedule item is added to the VCO schedule of values with a schedule ID of New.
The schedule item can be edited as needed. After the VCO is executed and published, Contract assigns a Schedule item ID and adds it to the Contract Schedule of values register.
You can add a schedule item that already exists in the contract-level schedule of values to the vendor change order schedule of values.
From the vendor change order Schedule of Values page, click the Add icon, and then select Add existing schedule item. The Add Schedule item dialog box opens with a list of schedule of value items from the contract-level schedule of values.
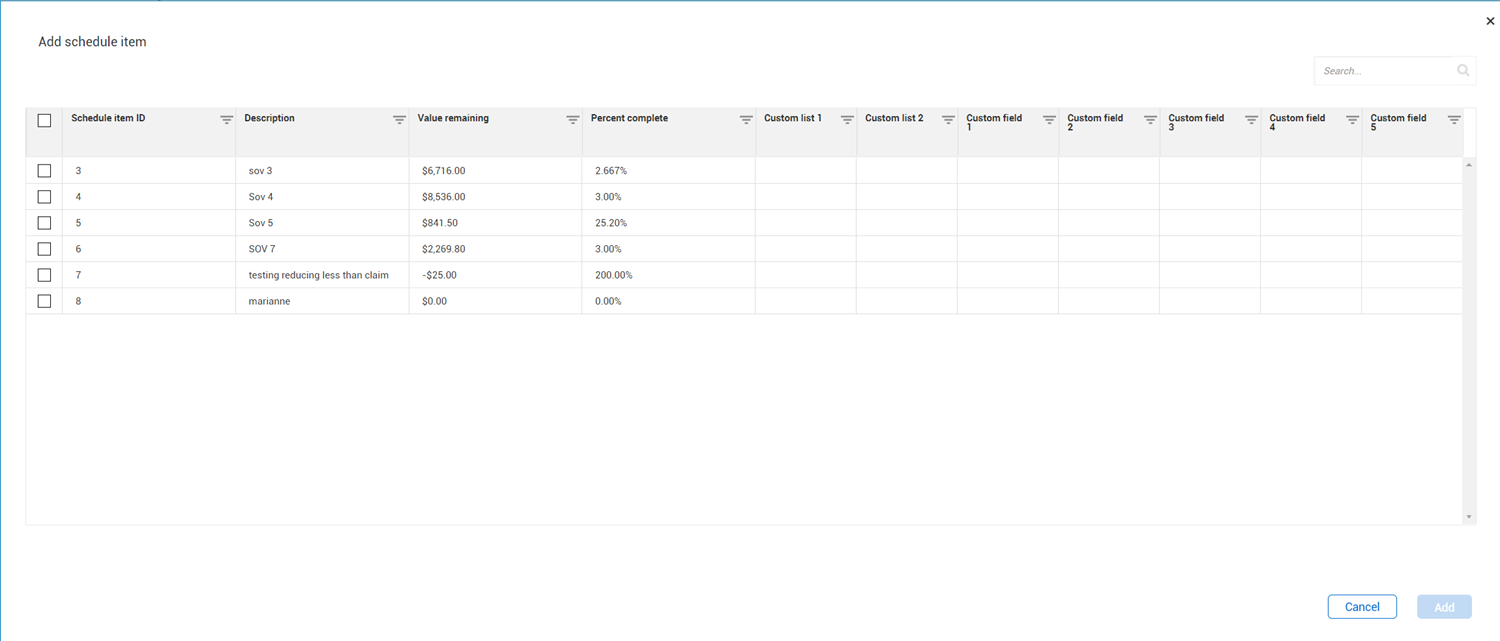
Select one or more items, and then click Add. The items are added to the schedule.
You can update the Quantity or Value columns in the Change order adjustment section. When you update the Quantity column, the value in the Value column is automatically adjusted, and vice versa. If you want to include the items in the vendor change order, you must push them to the line items tab.
You can also add a schedule of value item from the Vendor change order Line items register. Any line item type can be copied. After the line items are copied, the schedule of value items show in the Change order adjustment section of the vendor change order schedule of values and are automatically associated to the line items. To copy a line item from the Line items register to the schedule of values, select the line item, and then expand the Copy icon. You can then select To schedule of values. A notification shows that the line item has been added to the schedule of values.
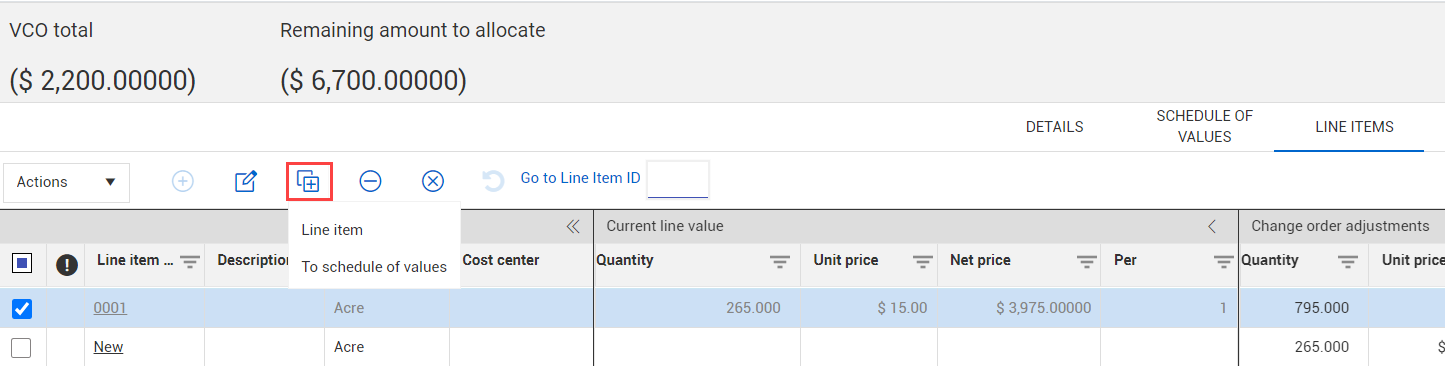
The following columns are copied with the line item:
Contract line item ID
Description
UoM
Quantity
Unit price
In the Change order adjustments section, the values of the Quantity, Unit Price, and Value columns are calculated as follows:
When the line item has a positive net price, a quantity, and a unit price in the Change order adjustments section, the copied schedule item uses the line item change order adjustments quantity and unit price.
When the line item has a positive net price and a quantity in the Change order adjustments section but no unit price change, the copied schedule item uses the line item change order adjustment quantity and calculates the unit price as the adjusted net price divided by the adjusted quantity.
When the line item has a positive net price and a unit price in the Change order adjustment section but no quantity change, the copied schedule item uses the line item change order adjustment net price divided by the change order adjustment unit price to calculate the quantity.
When the line item has a negative net price in the Change order adjustment section, the copied schedule item will be value-only.
The Hide in Plan/Progress field in the schedule of values defaults to Yes. You must manually fill in the remaining fields. The line item is automatically associated to the schedule of values.
Any deleted line items are copied, but they do not have a line item ID.
Push schedule items to the Line items tab when you want them to be included in the vendor change order.
Contract pushes only the line items that are associated to the Contract schedule of values. If there are schedule items that are not associated to the Contract schedule of values, you must execute and publish the vendor change order. The Push to line items button is enabled if any of the schedule items have a Contract line item ID. When the Contract line item ID is blank for all items, the Push to line items button is disabled, and you cannot push items to the Line items tab. The contract must be published to push schedule items to the Line items tab.
From the Vendor change order Schedule of values page, click Push to line items.
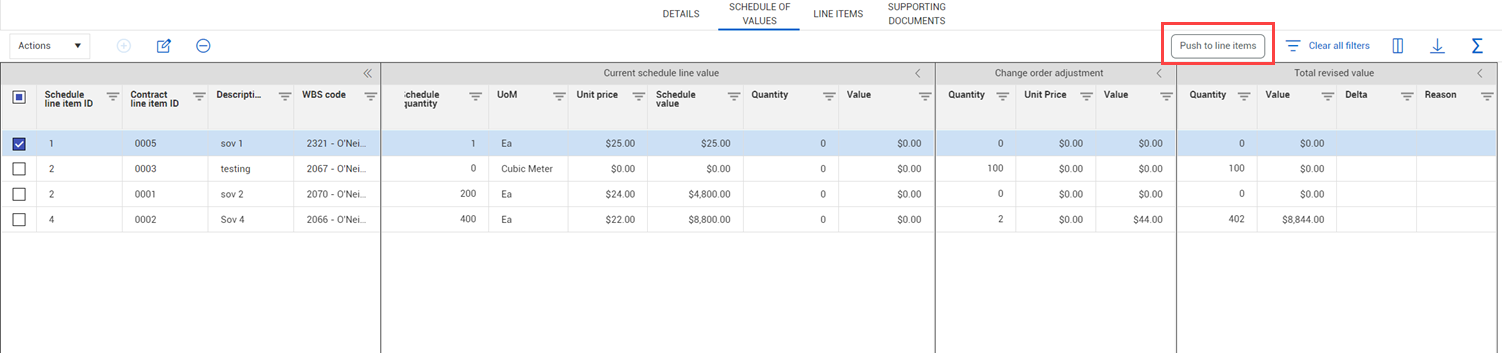
A warning message indicates that the push updates the Line Items tab with values from the schedule items. If the associated line item has a zero unit price, the message indicates that the adjustment quantity and unit price cannot be calculated and asks if you want to proceed.
Click Yes to push the schedule items to the line items tab. Any value or line item that was added to the Line Items tab is removed. Contract then pushes only the line items that are associated to the Contract schedule of values and calculates the line item values. If the line item has a zero unit value, no values are calculated for the Change order adjustments section of the vendor change order. You can add them manually.
On the Line items page, the total values are shown in the Net price column in the This submission section. If there are multiple schedule items tied to the line item, Contract adds them together to populate the Net price column.
You can resend an executed vendor change order. Resending the vendor change order lets you resend the VCO via API in case of a communication failure with the ERP system without resending the entire contract.
You must have the Stop integration sync permission to resend a VCO.
The Resend Vendor change order (Request) button is enabled for executed vendor change orders only and is in the contract-level Vendor Change order log.
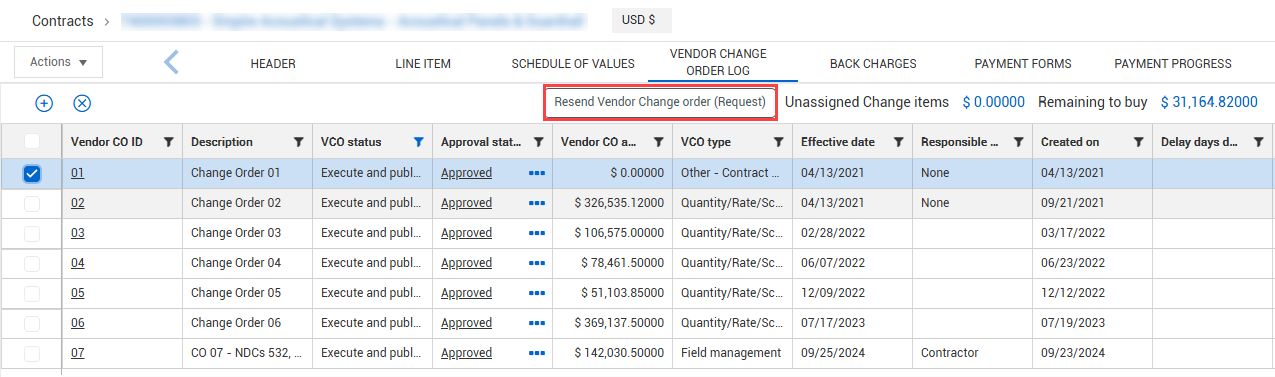
From the contract’s Vendor Change Order Log tab, select a VCO.
Click the Resend Vendor Change order (Request) icon. The VCO is resent.

The Administrative notes for the vendor change order shows that the vendor change order was resubmitted. You can view the request in the Sync Log tab
Additional Information
9977 N 90th Street, Suite 250 Scottsdale, AZ 85258 | 1-800-637-7496
© 2024 InEight, Inc. All Rights Reserved | Privacy Statement | Terms of Service | Cookie Policy | Do not sell/share my information